


The Potty Plotters grow your own blog; May to June
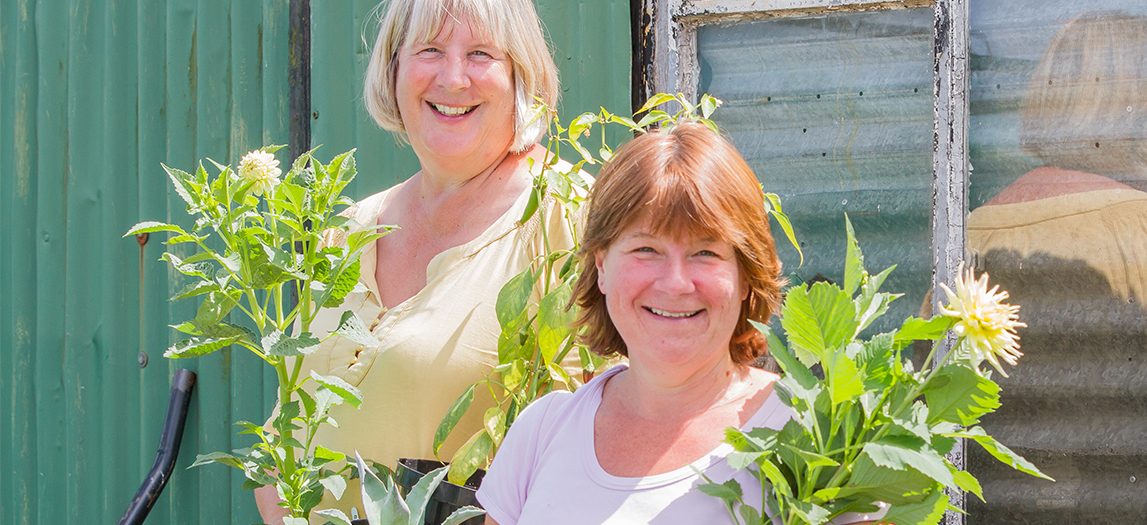
Grow your own has become a firm favourite following the enforced lockdowns of recent years. It’s something that many National Garden Scheme garden owners champion and an area of growing interest to garden visitors looking for inspiration and advice. With kitchen gardens, community gardens and allotments now firm favourites in the National Garden Scheme portfolio we’ve invited The Potty Plotters, Elaine and Julia (our Impact Report cover girls from Ashbourne Road and District Allotments in Derbyshire pictured above) to share their seasonal tips each month for getting the best out of your grow your own plot.
Leeks
Let’s get ready to learn something new!
The leek seedlings should now be about the size in height and almost width of a pencil. As you decide that ‘today is the day’ for planting them in a new bed, water them well in their container or pots and leave them for about half an hour giving the water time to seep into the matted roots.
Carefully tip the seedlings out and gently tease the seedlings apart being careful not to damage the root system.
Having raked the patch of ground where the leeks are going to grow for the next few months, create ‘a string line’ across the ground (as we did last month.) Now, with an iron bar (with a diameter of about an inch), line it up with the string and push it down into the well dug soil. ‘Screw’ the bar downwards by moving the bar round and round until it sinks about 3 inches. If the loose soil tumbles into the hole, just push it back gently to keep the hole intact.
Take a leek seedling and ‘wind’ the root system into the hole and then place the rest of the seedling on the top. DON’T FILL THE HOLE IN! Continue to plant the other seedlings about 6 inches from each other until the first line is complete. With a watering can water into each hole and as the holes fill over the weeks to come, the soil will naturally connect round each plant to give it support.
The main pest for leeks is allium leaf minor which sadly, are almost invisible until the leeks are dug up to eat later in the year – by which time, prevention is too late! So to avoid this pest, surround the plants when set with a barricade of environmesh standing about 12 inches high around the row.
Potatoes
As the weeks have past, the green potato leaves have now shown themselves through the soil. Glee and delight as this always feels like a success – but it’s the start of their continuing care programme.
Although the weeks this year seem to have been incredibly mild, we are still at the mercy of the weather ahead and late frosts which cause havoc on our allotments. So, be ready to hoe up lose soil over the potato tops and simply cover them with soil (or even grass cuttings.) This will protect the potato tops from being ‘burnt’ by the frosts which in turn will stop the tops from growing and flowering. If by chance they do get frosted, cut the stalk off the plant near to the ground and no harm should come to the growing potatoes underground.
Hoeing up the loose soil is easiest after a downpour of rain as it makes the soil easier to work with and this is the reason to leave a gap between the rows or there won’t be any ‘spare’ soil to work to work with or even room to stand.
As a rule, we don’t water our potatoes once they have been set in the ground but this is the choice of the individual. We don’t have any problems with not adding water but what of those we planted in tubs? These too are now in flower though we water them when it rains and again, protect them from any frosts when forecast.
Depending on when you planted your potatoes and what kind they were will now dictate when to dig the plant. First earlies are usually in the ground about 10 to 12 weeks. Accordingly, second earlies are the second lot to be ready and lastly, main crop can be left in the ground until September – though remember, the longer they are in the ground and wet weather arrives, the more likely they are to suffer slug and wireworm damage.
Sweet peas
We know that seasons don’t actually ‘smell’ but the fragrance from flowering sweet peas is nothing but bottled summer and sunshine! A small vase of picked stems fills any room with that distinct sweetness and although they only last a matter of days, it is definitely worth growing them for the ability to be able to continually pick the memorable floral wonder!
By nipping out the tops off the seedlings we have now planted them out into their final planting stations – both in the ground on the plot and also in large containers around the allotment site.
As we said last month, most sweet peas are natural climbers. They want to move upwards as they grow and have something to cling on to in doing so. If you have planted them in a large container, place long, sturdy twigs or bamboo canes in a circle round the perimeter of the container for the plants to attach themselves to as they grow. We also entwine string in the midst too which support the twigs as well as the plants. Tie in the plants that stray out of the supports too.
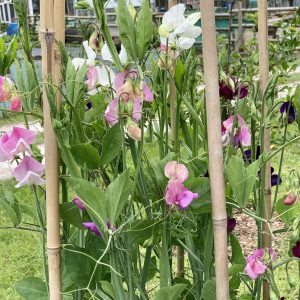 To get the most from the plants, we place the container itself in the shade. This keeps the root systems cool and seems to prolong the flowering season too. Water regularly to keep the roots damp as if the plant dries out, there is no recovery remedy and usually will then quickly go to seed and fail to produce any further blooms and remember – the more you pick the more you get. This surely is the most giving of all plants at this time of year?
Broad beans
Depending on the variety of broad bean you choose to plant will depend on how tall the plants maybe by the time you read this!
The rows of ‘Crimson Flowered’ in the poly tunnel are experiencing a growth spurt. The scent from the small, red flowers is ‘heady’ in early evening and a buzz with bees. Multiple small beans have already emerged and will ready within weeks to harvest. Through the doors though in comparison, outside in the raised beds the taller variety ‘Green Piece Master Long Pod’ is growing slow and steady and already in need of more supports.
As the plants grow, they do get battered by the winds so simply tie another ring of string either side of the plants so if the wind does strike, the plants will merely bend towards the string but not break the stalk.
Towards the end of June, look through the foliage at the bottom of the stalks to check for beans that may be growing there!
Container grown broad beans are a delight to watch grow on the back yard. We use a variety called ‘The Sutton’. Easy to get growing and a small pod packed with beans!
- Simply fill a bucket or pot (with holes in the bottom) with compost and or soil
- Set some seeds on their sides about 4 inches from each other and around 2 inches down into the soil
- Cover the seeds with the soil and water
- Leave the container somewhere in the light and make sure it doesn’t dry out. In a few days the seeds will sprout and green shoots will appear. They grow between 10 and 20 inches and we ‘support’ with just a few twigs to keep them upright! Quick and easy and great for children to do during the school holidays
A word of warning; black flies love broad beans too! The recommended solution is to nip out the tops (cut or snap with your fingers the top tight cluster of leaves) when the first pods emerge at the bottom. We’ve done this with mixed success in defeating them but the broad bean tops that you take can be eaten and are delicious so do it anyway and be prepared to squish the blackfly!
Beetroot
The beetroot seeds have germinated in the recycled containers and the little seedlings are now ready to be planted outside.
Touching the soil, you can feel the warmth’ Perfect for the seedlings to thrive in, so plant as many seedlings as you have room for and the leftovers – use the leaves as a salad leaf or even a trendy ‘micro green’!
- Wet the seedlings making it easier to take out individual ones
- Now set your line of string from one side of the planting area to the other
- At the start of the line and level with it, pop your finger in the soil and make a hole about an inch in depth
- Remove one beetroot seedling and drop into the pre-prepared hole
- Pull the surrounding soil around the seedling and firm in the soil around the plant to make sure it is ‘standing’ up not lying on its leaves
- Leave a gap of about 3 inches and repeat the process until the row is complete
- Set the next row about 6 inches away. This will give ample room for the plants to grow and expand (and we all need that nowadays!)
- Water when to soil is dry but try not to do this in the sunshine as the water will ‘scorch’ the beetroot leaves
Beetroot is an easy vegetable to grow and needs very little fuss in terms of care. Few pests bother it but is so versatile; a roasted root, pickled in chutney, raw in salads and heavenly camouflaged in scrumptious chocolate cake!
We use this as a succession plant and will continue to plant more seeds every few weeks to ensure a continuous supply of it.
Parsnips
The great thing about sowing parsnips the way we do means that we have little else to do with them once they show themselves in the allotment beds.
The plants have now established themselves as seedlings and now all we have to do is make sure that they remain weed free.
This vegetable will be ready to harvest in about September but remember to keep them watered during the dry periods so they don’t stop growing.
Chillies aubergines and peppers
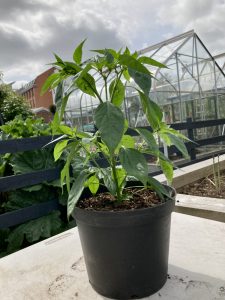
All are now showing their roots out of the bottom of their pots and are ready to move into their final growing container and position.
Before we transfer them, we stand the pots in a tray of water to allow each plant to take in as much water as they need and make it easier to slide them out of their pots.
From here on in they are treated very differently…
Chillies – These are transferred into a 10-inch pots with the compost from a ‘growbag’ at the bottom and around the sides to provide them some nutrients for about six weeks. Chilli plants really love the heat and watering is restricted to little and often – you almost need them to ‘droop’ their leaves before perking them up with a little drink. (Don’t we all know that feeling!) Some folk feed their chilli plants with a high potash feed to encourage growth and fruiting but we like to treat them mean to fire them up and make them hotter (it really does work) and we’ve never had a shortage of chillies so why bother?
Aubergines – Experience has taught us (reasons to follow) to plant our aubergines in containers, flower buckets are ideal and often freely available in supermarkets (just don’t forget to make holes in the bottoms for drainage!)
Using the compost taken from a ‘growbag’ to fill the container, position the aubergine plant on top of a good depth of mix. (The stem should be approx. 2 inches from the top of the tub.) Fill in down the sides gently firming in as you go. Insert a 4ft cane next the stem now as it will be easier to do now than later when more roots have formed. Using a piece of twine, about 10 inches long, loosely tie the stem to the cane using a figure of 8 pattern. Repeat this as the plant grows.
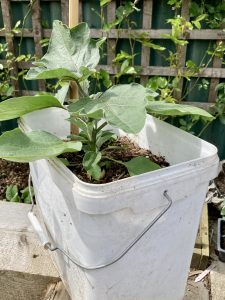
Ideally aubergines need to be grown indoors as they thrive in heat and high humidity which can rarely be achieved outdoors. If you have a greenhouse or polytunnel that’s perfect. To raise the humidity, simply spray a water mist onto the plants or leave bowls of water between them. We water the concrete paths inside our greenhouses at least once a day to raise the humidity levels and it really is a necessity… let the levels drop and the plants may be vulnerable to an attack of red spider mite!
Red spider mite can be very tricky to deal with…hence the containers! If you’ve got them, they will almost certainly head towards your aubergines first so hoof the plants outside before the mites take hold in your greenhouse. We’ll tell you more about how to deal with them next month.
Plants need regular watering which should be increased once the fruits begin to appear. Keep the compost moist to the touch and don’t let it dry out or you’ll end up with tough seedy fruit and no one wants that! They also need a regular high potash feed, something like tomato food once the first flowers appear.
Aubergines are not the easiest thing to grow or to look after, but they produce beautiful flowers and as the fruits begin to swell so will your pride and your kudos amongst other growers. (Not that we are competitive!)
Peppers – They may be closely related to the chilli plant, but peppers need to be treated with more love and kindness……..
Don’t worry though their needs are simple; a comfortable place with enough room to grow, a bit of support and regular food and water. Perhaps we should all take lessons?
Plant them in containers (as described for the aubergine), in grow bags or directly into your soil (dig a big hole, fill the bottom with compost, sit your plant level to the surface of the soil and then fill in the sides with compost firming in). Water them regularly just away from the stem and give them a weekly feed once the flowers appear with….yes you’ve guessed it, tomato food!
Although peppers will grow happily outside, they prefer to be inside the greenhouse or polytunnel where they will grow and ripen much quicker. If you do plan to grow them outside, wait until all chance of frost has passed, (here in Derbyshire that is the end of May) and then try to find them somewhere in full sun which is sheltered.
As your pepper plant grows and becomes heavy with fruit it will need support. Insert a 4ft cane next to the main stem and tie with twine in regular intervals with a figure of 8 (round the cane, cross the ends, then round the plant and tie). You may need to add additional canes and twine to support the side stems and fruit but don’t worry if you do, just make sure to put something over the canes such as an old water bottle/ping pong balls/socks…anything so you don’t poke yourself in the eye! Health and Safety? Tick!
Peppers ripen on the plant and go through a spectrum of colours generally starting with green (bitter) and ending in red (sweetest). You don’t have to wait, just pick according to your taste!
Peas
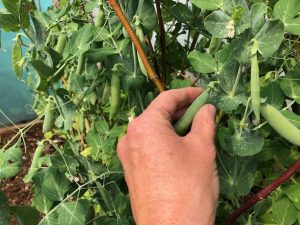 With the last few weeks, we have planted peas – not one type but lots of them!
Tall ones (like ‘Alderman’) and short ones (like ‘Half Pint’), in pots, in containers, in gutters and in rows, in circles, in lines, in raised beds as well as on the plot. It’s fair to say “Where’s there’s a pea, there’s a way”!
The main thing to remember with peas is they don’t like to be too hot preferring shade to full on sunshine. If you have planted out into containers, move them to somewhere light and warm, but try to keep their roots shaded and damp too.
Where we have planted in rows, we have also set other plants in front of them and behind them to keep their roots shaded such as lettuce or potatoes.
Container peas really don’t need any supports to keep the plants upright but the standard garden varieties (such as Ambassador or Onward etc) and taller types need things to climb up and onto.
On the rows on the plot, we simply push twigs into the soil in front of the pea seedlings. The tendrils on the plants grab hold of the rough twigs and climb up them as they grow. We also add netting around the plants so that the birds can’t get at the tops! Birds are content to take out the tops of the plants leaving them without leaves and whilst we love the birds, we work too hard to let them have everything we grow!
Keep the peas (where ever you grow them and in whatever you chose to grow them in) well-watered as if they dry out, the plant will simply die back and not recover. But try growing them in containers too as a novelty instead of bedding plants for the year? Fresh peas are a novelty and can always be frozen if you grow too many?
Tomatoes
With the consistently warm weather recently the tomatoes have been growing at some pace. Ever conscious of our ‘last frost’ date and having been caught out before, we continue to pot on the tomatoes (which are not frost hardy) into the next size up of pots so that we can fleet them away or huddle them together under protective horticultural fleece.
Julia has decided to risk planting out some of her tomatoes into the polytunnel, knowing that she has ‘backups’ available if a ground frost should strike.
If you haven’t planted your tomatoes from seed or have never grown any before why not think about buying a bush variety of tomato plant to grow. These are much easier for the ‘beginner’ as there is no ‘pinching out’ and very little support is required. Plants can be grown in both hanging baskets and containers, and other than regular watering and a weekly feed there’s very little to do…except to pick and eat (obviously!)
If you have already grown tomato plants and are confident of your local weather, you can plant your tomatoes in containers, growbags, or directly into the ground (as we described with the pepper) now. Depending on the variety you are growing will determine how much space and support you need to give your tomato plants. Cherry and standard tomatoes can be grown closer together and need much less support than the big beef tomatoes. Supports can be anything from a single cane (you’ll need one at about 6 ft, tie in the central stem at regular intervals using the figure of 8 method) to elaborate cages or frames you can buy specifically for the job, or you can just ‘string them up’
To string a tomato plant up you need an overhead beam or cable to attach the string to.
- Dig a hole
- Cut a piece of string long enough to reach between the ground and your overhead support
- Tie a loop (approx. the size of your wrist) in one end of the string and place it in the hole
- Place your tomato plant on top of the loop and now back fill your hole to properly plant your tomato. You now have a loose piece of string next to your plant
- Wrap the string once loosely around the main stem of your tomato, then take it right up and tie it to the top of your support beam/cable.
- As your tomato grows wrap the string gently around the central stem.
If you are growing a ‘cordon’ or ‘indeterminate’ variety of tomato (it will tell you on your seed packet or plant label) you’ll need to start ‘pinching out’ the side shoots. It’s something many people worry about but once you know which bits to take out it really is easy. The reason we do this is to focus the plants energy on growing fruit rather than leaves. It also improves the airflow around the plant thereby reducing the risk of diseases.
To ‘pinch out’ side shoots:
- Look at your main stem
- You will notice leaves and flower trusses growing at about a 90o right angles up the main stem
- Where these join small side shoots will start to emerge at about 45o angles, pinch these out with your finger and thumb as soon as you see them
- If you miss them when they are small, use a pair of secateurs to remove them with a clean cut
- Check regularly (twice weekly ideally) for new side shoots and keep pinching out
And finally, just a word on watering and feed this month. Whilst the plants are small don’t be tempted to overwater, just don’t let them dry out. Always water at the base of the plant and never ever water over the top. When you see the first flowers appear it’s time to get the tomato feed out….
Top Tip: It’s a good idea to set yourself a specific ‘feeding’ day, it makes life a lot easier! In days where remembering has become trickier!
Lettuce
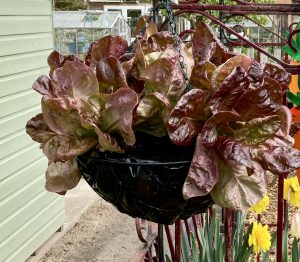
Why not try growing your own lettuce? On consecutive years we have been told there will be a food shortage and certainly a rise in food costs so give it a go!
Instead of buying bedding plants for a hanging basket, why not buy a packet of lettuce seeds like ‘Cut & Come Again’. Hundreds of seeds that will keep for a few years and you in lettuce for months!
- Line a basket with something like an old compost bag cut to fit the basket
- Make plenty of holes in the plastic and then fill with compost or soil
- Water so that the soil is wet
- Sprinkle a few seeds on the top of the soil and add a covering of compost
- Put the basket somewhere warm to get the seeds germinating
- Once the seeds start to grow, move outside and makes sure that it doesn’t dry out
As the lettuce grow, cut the leaves and they will grow again! Ooops, I feel that song coming on from Frozen “Let it grow, let it grow….!”
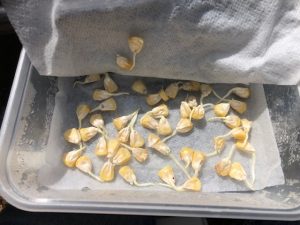
Sweetcorn
No matter what you grow for yourself, ‘growing your own’ is all about the flavour and certainly sweetcorn is a good example of that. Flavour. Sweet. Juicy. Easy to freeze and generally, one vegetable that the kids love!
How to do it? We know we have already mentioned it a few times but this is definitely THE way forward for home growers. No wasted time and no wasted compost.
- Find a clear plastic container like a takeaway container
- Line the bottom of it with kitchen towel or toilet paper
- Wet the paper
- Empty the packet of sweetcorn seeds onto the paper
- Rip another sheet of paper to fit the container and put it on the top of the seeds
- Wet the top layer of paper too and clip the lid on the container so it is airtight
- Put the box somewhere light and warm – a windowsill is a good place
- Check the seeds after 3 days. As soon as they start to chit, remove the top layer of paper
- When most seeds have chitted, find out some small plant pots. Fill them with compost and water. Now make a hole in each with your finger (about 1 inch deep.) Add one seed to each pot and cover with the damp compost
- Keep the pots in a warm light place. In a few days the green shoots will appear
- In about 2 weeks when the plant shoots are about 4 inches high, they will be ready to plant out
Sweetcorn needs to be planted in ‘blocks’ not rows. This is to help the plants pollinate each other. It’s important to remember to always plant the same type of seeds next to each other so that the plants don’t cross pollinate. If this happens, the cobs of corn are rubbery and ‘starchy’ to taste.
Leave enough space between each plant for them to grow and consider how the plants are going to be protected from slugs.
Get the butter ordered now as in few months, it can be lathered over the bright yellow, sweet, juicy sweetcorn cobs. And don’t forget the toothpicks too!
Missed the last blog – find it here.

Planning, preparing and planting now will reap rewards in the months ahead – Photo: Amanda McConnell